Instructions

#1240 Electric Focuser

For use with Meade Digital Electronic Series (DS) Telescopes

 
The Meade #1240 Electric Focuser is engineered for smooth, rapid focusing of the Image with the Digital Electronic Series (DS) Telescopes. The #1240 Electric Focuser offers coarse and micro fine speeds. When purchased as an add-on accessory, the #1240 Electric Focuser includes a hand controller accepting one (user-supplied) 9-volt battery.
 
Alternately, if your DS telescope Is equipped with either the #492 Dual-Motor Electronic Control System or the #493 Autostar Computer Control System, the focuser may be plugged Into, and powered by, the telescope's control panel, with operation activated through either the Electronic Controller handbox or Autostar handbox, respectively.
 
PARTS LIST
 
When opening the packing box for the first time, note carefully the following parts included with the #1240 Electric Focuser:
• Electric focuser three-button hand controller (provided when the #1240 Electric Focuser is purchased as a separate accessory) (1, Fig. 1)
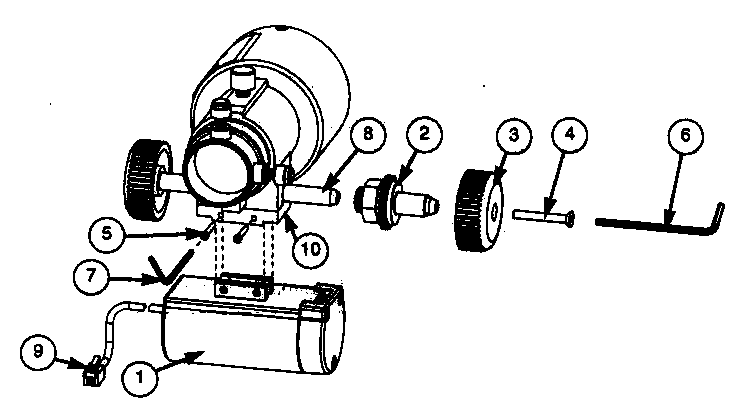
• Electric focuser gearbox with attached cord (1.Fig.2)
• Clutch assembly (2, Fig. 2)


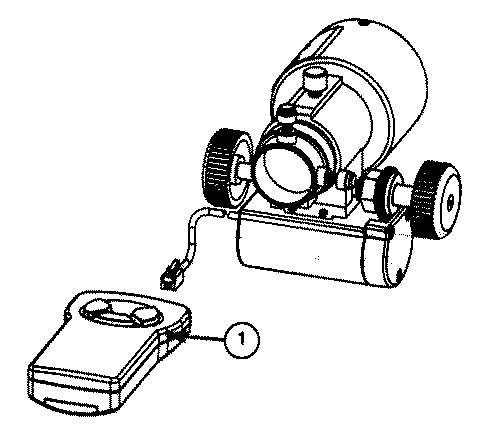
Fig. 1: #1240 Electric Focuser Installed.
 (1) Three-button hand controller.


• M4x30mm-long flat-head socket screw (4, Fig. 2)
#2xS/8"-long socket-head cap screw (x2) (5, Fig. 2)
• M2.5mm hex-wrench (6, Fig. 2)
• 5/64- hex-wrench (7, Fig. 2)
 
INSTALLATION
 
To attach the #1240 to the telescope, use the following procedure:
 

1. Use a #1 Phillips screwdriver to remove the Phillips oval-head screw from the right-side focus knob (3, Fig. 2). Slide the focus knob off the focus shaft (8, Fig. 2).


NOTE Do not discard the Phillips oval-head screw removed In step. 1. If the Electric Focuser Is ever removed, this screw must be re-Installed on the focus knob.


2. Place the clutch assembly (2, Fig. 2) on the focus shaft (8, Fig.-2) so that the large hex- nut-faces the body of the telescope.

3. Place the focus knob (3, Fig. 2) onto the shaft of the clutch assembly (2, Fig. 2). Insert the supplied flat-head screw (4, Fig. 2) through the focus knob and tighten, to a firm feel only, using the supplied M2.5mm hex wrench (6, Fig. 2).

4. Place the electric focuser gearbox (1, Fig. 2) under the telescope's focuser assembly (10, Fig. 2). Slide the two brackets on the top of the focuser gearbox housing Into the two slots in the bottom of the focuser assembly.

5. Place the two socket-head screws (5, Fig. 2) into the holes in the focuser assembly (10, Fig. 2). Tighten the screws, to a firm feel only, with the supplied 5/64" hex wrench (7, Fig. 2)....

6. Plug the connector (9, Fig. 2) into the hand controller (1, Fig. 1) and Insert one (user-supplied) 9-volt battery Into the compartment In the rear of the handbox. If you have an Elec­tronic Controller (EC) or #495 Autostar Compu­ter Controller, plug the cord into the AUX port of the telescope's Computer Control Panel.


The #1240 Electric Focuser Is now ready for operation.
   

Fig. 2: #1240 Electric Focuser (Exploded View).

(1) Electric Focuser gearbox; (2) Clutch assembly; (3) Focus knob; (4) M4 x 30mm-long flat-head screw, (5) #2 x 5/8"-bng socket-head cap screw; (6) M2.5mm hex wrench; (7) 5/64" hex wrench; (8} Focus shaft; (9) Connector to handbox.

OPERATION

The #1240 Electric Focuser may be used with either the standard-equipment hand controller (1, Fig. Y), the Electronic Controller handbox (Included with the EC version of the DS telescope or the optional #492 Dual-Motor Electronic Control System), or the #495 Autostar Computer Cont-roller - included with the #493 Autostar Computer Control System, or available separately). Proceed to the appropriate step below for the focuser control being used. NOTE: To use either the Electronic Controller or Autostar, plug the focuser cord Into the AUX port on the telescope's Computer Control Panel. To apply power, plug the power cord Into the 12v connector on the telescope's Computer Control Panel.

1. Electric Focuser Controller: The standard-equipment hand controller has two speeds of operation: coarse and micro fine. The speed is changed by pressing the SPEED key. The left arrow focuses farther out and the right arrow Focuser closer in.

2. Electronic Controller (EC): After power Is applied, the four electronic controller lights flicker. Press any button and one light comes on steady. Press the SPEED key to switch between the four available focusing speeds. Focusing speed is Indicated by the four lights:

the top light is fastest and the bottom light is slowest. The IN and OUT keys move the focus appropriately in or out.

3. Autostar Computer Controller: After power Is applied and Autostar has been initialized (see the Autostar instruction manual), press and hold the MODE key for 2 seconds. The telescope status screen-appears. Use the up and down arrow keys until the following message appears, if it is not already on screen:

Focus Control: use UP/DOWN.

The focuser speed is controlled through the number keys: 1 and 2 are slow; 3,4, and 5 are moderate; 6 and 7 are medium; 8 and 9 are fast. Use either the right or down arrow key to move the focus out. Use either the left or up arrow to move the focus in.

CLUTCH ASSEMBLY ADJUSTMENT

Adjust the clutch in either of the following situations:

 • if the clutch is too loose, allowing the clutch to slip instead of moving the focus drawtube.

 • If the clutch Is too tight, making it difficult to turn the focus knob (2, Fig. 1) to override the electric focuser.

If you need to adjust the clutch, do so as follows. Hold the focus knob (2, Fig. 1) with your fingers and turn the nut with a 3/4" open-end wrench or adjustable wrench until you attain the desired feel.
tmp102-2.jpgMeade Instruments Corporation

                    6001 OAK CANYON, IRVINE, CALIFORNIA 92618-5200 U.S.A.
                    (949)451-1450 • FAX: (949) 451-1460 • meade.com

Ðåêëàìà:
Hosted by uCoz